Techletter #46 | October 15, 2023
This is the second part of the series on how authentication works in web apps. Before moving ahead I recommend you check PART 1
In the last part, we discussed HTTP headers, Cookies, Middlewares, & Session. Let’s continue with the passport-local strategy in this part.
passport-local strategy
This module lets you authenticate the user using username & password.
Implementing this type of login is important, because, you can’t always depend on third parties like Google-login, Facebook-login etc. Why, because you shouldn’t expect your user to have a Google/Facebook or any third-party account for logging in to your system. Having them would be great, but using local strategy is something a must when you scale.
Managing user data can be risky. You need to have good security in order to protect it. You can’t store the password in plain text, it must be encrypted/hashed and then it should be saved to your db. Using a passport-local strategy, we offload a lot of those work. It manages the encryption & verification for us. But, of course, you need to be accountable for your database which stores user data like usernames, hashed passwords, etc.
First, let’s setup the passport file
const passport = require('passport');
const LocalStrategy = require('passport-local').Strategy;
// MAKE SURE TO USE YOUR LOCAL MODELS FOLDER
const models = require('../models');
// validate the user entered passwords
const { validPassword } = require('../lib/passwordUtil');

const customFields = {
    usernameField: 'uname',
    passwordField: 'pw'
};

const verifyCallback = (username, password, done) => {
    models.user.findOne({
        where: {
            username
        },
        attributes: ['id', 'username', 'hash', 'salt'],
        raw: true
    })
        .then((user) => {
            console.log({ user });
            if (!user && !user?.id) { return done(null, false); }

            const isValid = validPassword(password, user.hash, user.salt);

            if (isValid) {
                return done(null, user);
            }
            return done(null, false);
        })
        .catch((err) => {
            done(err);
        });
};

const strategy = new LocalStrategy(customFields, verifyCallback);

passport.use(strategy);

passport.serializeUser((user, done) => {
    done(null, user.id);
});

passport.deserializeUser((userId, done) => {
    models.user.findOne({
        where: {
            id: userId
        }
    }).then((user) => {
        done(null, user);
    }).catch((err) => done(err));
});
customFields is an object that specifies the fields in the request body that will be used to extract the username and password. It specifies that the username should be extracted from the uname field and the password should be extracted from the pw field.
verifyCallback: It receives the provided username and password. Inside this function, it queries the database using models.user.findOne to find a user with the given username. If a user is found, it checks whether the provided password is valid by comparing it to the stored hash and salt using validPassword from passwordUtil. If the password is valid, it calls the done callback with the user object, indicating a successful authentication. If the password is invalid or the user is not found, it calls done with false.
passport.serializeUser and passport.deserializeUser methods work together to manage user sessions and store/retrieve user information during the authentication process.
The serializeUser method is called when a user is authenticated, and passport needs to store the user’s data in the session. This method allows you to specify which user data to serialize into the session, typically a unique identifier like userId.
The deserializeUser method is called on every request, allowing Passport to retrieve the user’s data from the session. It takes the unique identifier (like userId) from the session and retrieves the corresponding user’s data from the database.
Now, you have set up the passport-local strategy. It’s time to write the API and make use of passport to register & login users.
Below I have given the complete code for both the register & login API’s
'use strict';

const express = require('express');

const router = express.Router();
const session = require('express-session');
const MySQLStore = require('express-mysql-session')(session);
const passport = require('passport');
const { verifyLogin } = require('../middleware');
const { genPassword } = require('../lib/passwordUtil');
const models = require('../models');

require('../passport/passport');

const options = {
    host: 'localhost',
    port: 3306,
    user: 'root',
    password: 'DB_PASSWORD',
    database: 'YOUR_DB'
};

const sessionStore = new MySQLStore(options);

router.use(session({
    secret: 'session_cookie_secret',
    store: sessionStore,
    resave: false,
    saveUninitialized: true
}));

router.use(passport.initialize());
router.use(passport.session());

router.use((req, res, next) => {
    console.log({ session: req.session });
    console.log({ user: req.user });
    next();
});

router.post('/register', async (req, res) => {
    const params = req.body;
    const saltHash = genPassword(params.pw);

    const salt = saltHash.salt;
    const hash = saltHash.hash;

    const newUser = await models.user.create({
        username: params.uname,
        hash,
        salt
    });
    res.redirect('/api/login');
});

router.post('/login', passport.authenticate('local', { failureRedirect: '/login-failure', successRedirect: '/login-success' }), async (req, res) => {
    console.log(req.session);
    console.log('user', req.body);
    res.json({ success: true, message: 'Now you can login' });
});

module.exports = router;
When the user attempts to log in, the stored salt for their account is retrieved from the database. The salt is then combined with the entered password, and the same hash function is applied. If the computed hash matches the stored hash, the entered password is considered valid, and the user is granted access.
Make sure you have the verifyPassword function exported from lib/passwordUtiljs
const crypto = require('crypto');

function genPassword(password) {
    const salt = crypto.randomBytes(32).toString('hex');
    const genHash = crypto.pbkdf2Sync(password, salt, 10000, 64, 'sha512').toString('hex');

    return {
        salt,
        hash: genHash
    };
}

function validPassword(password, hash, salt) {
    const hashVerify = crypto.pbkdf2Sync(password, salt, 10000, 64, 'sha512').toString('hex');
    return hash === hashVerify;
}

module.exports.validPassword = validPassword;
module.exports.genPassword = genPassword;
Make sure you have the correct database models. I have used MySQL & Sequelize ORM. You can make use of MongoDB and Mongoose for replicating what I have shown above.
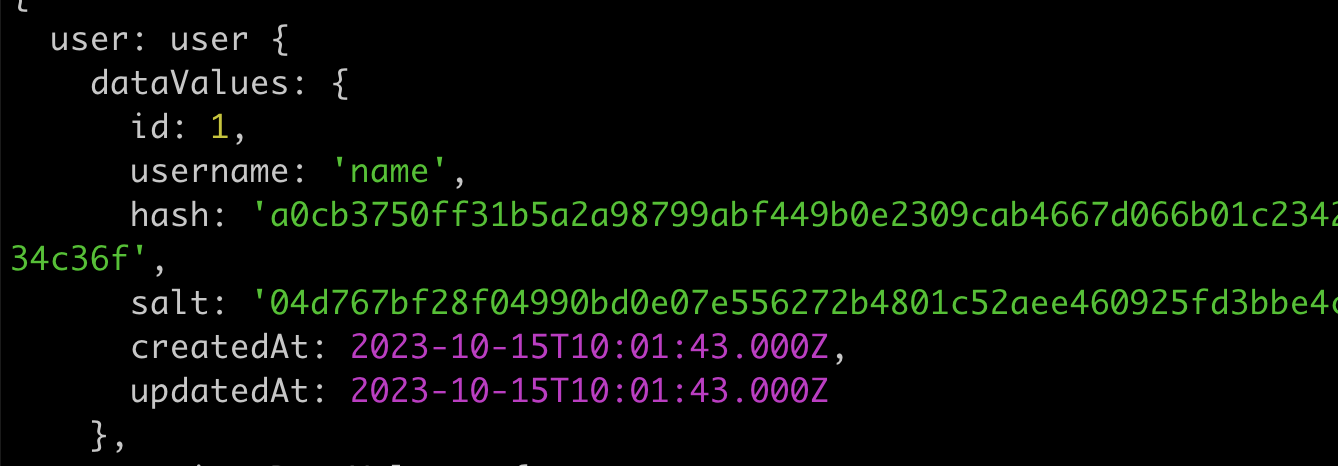
If you have done everything right, then you will be able to store the user data:

And with every API call, you will get the userId in the session
